Nirwanapoker is the official IDN Play agent site, providing the official download link for the latest IDN Poker APK in 2026. Join this site to play a variety of games such as online poker, IDNSlot, Toto Macau lottery, and soccer betting.
Big wins at Toto Macau sometimes come from numbers that many players consider trivial. Therefore, don't ignore odd numbers or double numbers that rarely appear. According to the Macau lottery results table at data macau 4d & 5d website provider, these types of numbers have actually been trending upward recently. You can check the complete statistics at ARIZONA88 to validate your predictions.
VIO88 provides a solution for players looking for the latest slot gacor links today. This link is official and updated regularly. Visit the website for more information.
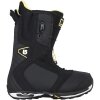
Light and strong thanks to ridiculous amounts of carbon, the NEW Diode makes it hard to tell where you end and your setup begins. With everything minimized, even the straps, and every contour considered, the result is full-wrap response and comfort that’s got the entire team asking for a set. Unlocking the baseplate’s full potential, Re:Flex™ technology delivers an evolution in natural flex, feel, and cushioned control that’s compatible with virtually every board under the sun.
BASEPLATE: NEW Single-Component Carbon Fiber/Nylon Composite Re:Flex
HI-BACK: NEW Ultra-Lightweight Single-Component Carbon Composite Hi-Back
STRAPS: React Strap and Gettagrip Capstrap™
BUCKLES: Dual-Component Smooth Glide™ Buckles
CUSHIONING: NEW Re:Flex FullBED Cushioning System with B3 Gel and Under-Baseplate Dampening Pad
Features Re-Ground Materials in Baseplate to Reduce Waste
Est bindings are Burtons exclusive binding technology that take board feel, response, and adjustability to the next level. By eliminating ordinary base plate disks to create smooth feel, and control with your snowboard.
Burtons Channel System is Burtons revolutionary mounting system replacing three and four hole patterns. When mounted with Burtons EST bindings your stance can be adjusted to any micro angle your mind can imagine.
First decide if you are regular of goofy footed (right or left foot forward). If you need help figuring this out, check out our How to figure out if you are regular or goofy footed article. Once you have that sorted out take a look at the little screw holes (inserts) in your board. Most manufactures put recommended stance markings by the holes they think are best for the average person. If you have never been snowboarding we think these holes are a good place to start. You can always move the bindings around and try different things later.
Find the disks, screws and washers that came with your bindings. The disks go in the bottom of the bindings (baseplate, where the soles of your boots are about to be. Depending on the bindings there might be padding you will need to remove to get the disks in there. All bindings have measurement markings on the disks and the baseplates. We suggest you start with both feet pointed away from you (the opposite of pigeon toed) with angles somewhere around 10 degrees. Again feel free to change up those angles until you find something that works for you.
Set the bindings on your snowboard over the holes you decided were best for you. When setting the disks into the baseplate at the angle you want, keep track of where the inserts are so you can line them up with the holes in the disks and get the bindings set at the correct angle. Once you have it lined up, screw the screws in and tighten them down but not too much. If you tighten the screws down too much it can actually pull the inserts toward the top of the board and put dents in the base.
Stand in the bindings and make sure it doesn't feel like you are doing the splits or something. If it does then take one of the bindings off and move it an insert closer. When everything feels good GO SNOWBOARDING!